I've wanted a purple blouse for quite awhile, and have never found one that I loved, that I was willing to pay for..... Even at my discount thrift store shopping. Until the other day, I ran into Goodwill quickly. I was on the verge of being disappointed in their knick knack section, and then occurred to me to search their sweaters for a good find. I have about three winter shirts that I have been rotating in this FL cold weather, and needed two or three more. I did find one nice sweater piece, with three-quarter length sleeves, and was quite happy with it. Then I found this:
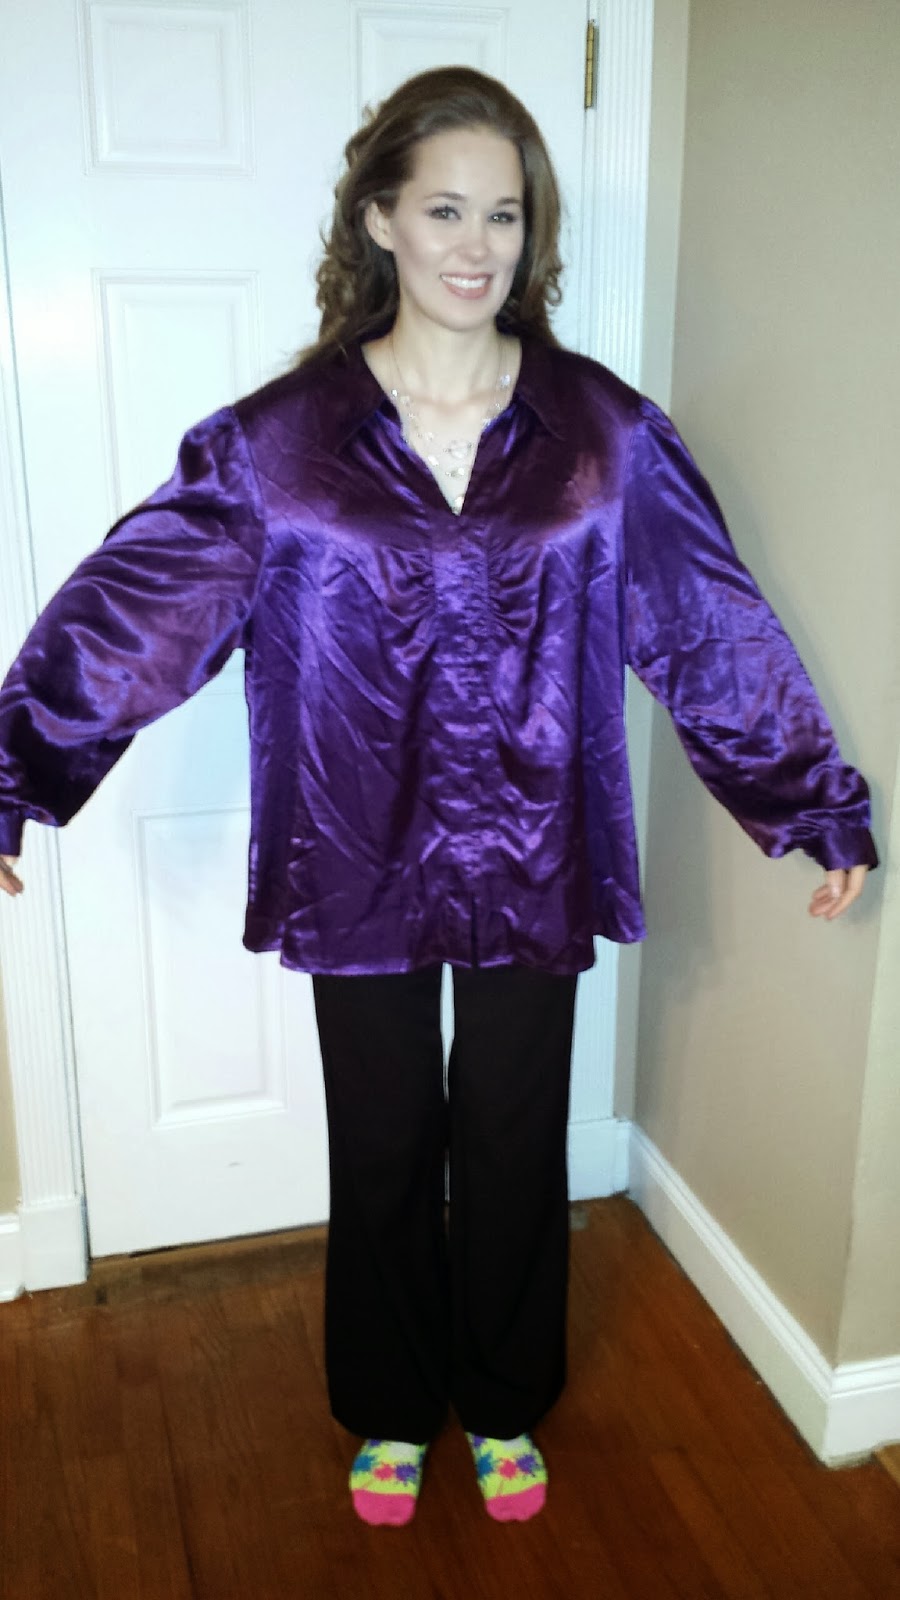
I love my loud, obnoxious socks! But that blouse.. 26/28 X. However I was certain I could turn this into the beautiful royal top of my dreams. I took this pic at my parents house, you shoulda seen the look on my brother's face when he saw this. It was a, 'please tell me you're not wearing that in public?' look. I set his fears to rest immediately.
Took it home and got to work. I turned it inside out on my dressform, and pinned a rather loose fit. I'm tired of always cutting the fabric too short or too tight, and was determined to do it right this time.
Then I chopped.
It was rather simple once I got past the fact that I would NOT be unbuttoning all those buttons everytime I wore this piece. I pinned both sides down and then tried to get it off my dress form, to no avail. I had to take the pins out of one side, and sew the other side first. I figured once the stitches were in place, it'd still come off the dress form when I pinned the other side. But when all's said and done, it was a very simple piece to make. Once the sides were sewn up, I carefully hemmed the sleevelines. The back of this top apparently scooped down lower than the front, and I didn't catch that at first, so the back was hanging down an inch or so lower than the front. Easy peasy, just make a hem and match the length of the fabric. I tried it on and made a tweak here and there, and then it was done. Pretty straightforward and simple, I probably finished in under an hour. Here is the finished piece.
A bit loose fitting, but I actually like it that way. It's comfy casual, and I LOVE the color!
Before and after:
Ta da!! My $4 top! I did find another purple top at that same Goodwill hunt, and another very interesting piece that will be all kinds of fun and torture to play with! I will keep you posted!
Monday, February 3, 2014
Sunday, January 12, 2014
$1 Alterations!
Hello again! I have a whole pile of refashions waiting to happen! Thrift store shopping after Christmas is so much fun! My best find so far has been a beautiful porcelain doll (Name brand tag still attached) for $1.50 because it was half off day at Salvation Army! I absolutely love such good deals!
Today's post isn't so much a refashion as it is a mere alteration. In fact, compared to some of my other refash's, these were a little bit on the boring side, so I'm including two before and after's, to make up for lost time a bit. Here is the first one. Found it at a mom and pop thrift store I'd never seen before.
There's not a vast difference really, it's supposed to be a loose fitting top, but now it doesn't look miles too big. (Like my new 'do'?) I didn't get pics of the alteration process, there really wasn't much point. I took it in on the sides and put some darts on the chest. (I have considered adding some bead work to the neckline to add a little interest, but don't know if that would be too officey/middle aged? Thoughts?) I could always wear a long necklace with it...
Here is my second top, and this one is a little more interesting.
I really love all things blue! And needed a top that might be a bit more professional. Apparently blue is the color to wear to auditions, so this'll be great for a business role!
I don't know if you can really see the ribbon/string/cord things hanging from the sleeves? I suppose they were for tying into a bow, or a knot if you prefer, but I found it highly annoying, and didn't want them dangling off my arms all day. I tied them into a very tight knot, and turned the shirt inside out, pinned the cords inside the sleeves, sewed them down, snipped off the rest and voila! They will not be missed!
After pic
Much more better! More fitted, although it may not be so obvious in a picture, I can certainly tell the difference. I didn't have to put darts in this one, it kinda already had them, all I had to do was take it in on both sides by about an inch and a half on each side.
So, two like new, beautiful blouses for $1 a piece! It really doesn't get better!
Just for kicks and giggles, I'll show before and afters of my hair, since I got it cut this week.
Today's post isn't so much a refashion as it is a mere alteration. In fact, compared to some of my other refash's, these were a little bit on the boring side, so I'm including two before and after's, to make up for lost time a bit. Here is the first one. Found it at a mom and pop thrift store I'd never seen before.
Not a thing wrong with it, aside from being at least two sizes too large. Easy fix, really. Here is the altered top.
Here is my second top, and this one is a little more interesting.
I really love all things blue! And needed a top that might be a bit more professional. Apparently blue is the color to wear to auditions, so this'll be great for a business role!
I don't know if you can really see the ribbon/string/cord things hanging from the sleeves? I suppose they were for tying into a bow, or a knot if you prefer, but I found it highly annoying, and didn't want them dangling off my arms all day. I tied them into a very tight knot, and turned the shirt inside out, pinned the cords inside the sleeves, sewed them down, snipped off the rest and voila! They will not be missed!
After pic
Much more better! More fitted, although it may not be so obvious in a picture, I can certainly tell the difference. I didn't have to put darts in this one, it kinda already had them, all I had to do was take it in on both sides by about an inch and a half on each side.
So, two like new, beautiful blouses for $1 a piece! It really doesn't get better!
Just for kicks and giggles, I'll show before and afters of my hair, since I got it cut this week.
I 100% prefer my hair long, and every time I get it cut I regret it, but I can't really do anything with it when it's that long. Maybe I just haven't found the right cut yet, haha.
Sunday, January 5, 2014
Life in the Abstract
Last night I was stricken with painting fever. I'm decent with drawing, but painting is a bird of another color. (Color, get it?) I pulled out an old canvas on which I'd already attempted a Pinterest Inspiration.
Well this isn't terrible, but I was not satisfied. So I just held on to it, as I can't abide the thought of wasting anything (as my craft room is testimony of, scraps EVERYWHERE!)
Then last night the bug hit me, so I pulled out this little used canvas, and went to town. I had visions of peacocks dancing through my head, but even I knew my pitiful skill in this art would not match my vision. However, you have to start somewhere, so start I did!
I didn't think to get process pics, but those really aren't necessary for this kind of thing. I finished and let the paint dry.
Well that's kinda cool I guess. Considering I didn't realize until I reached for the yellow just how few paints I really have. I will be hitting Hob Lob soon to fix that problem.. But somehow I just wasn't satisfied yet. I just decided to let it dry and worry about it tomorrow, it was midnight anyway, and Sunday School comes early.
Came back to it today. Decided to mix a touch more of the green, but didn't want to mix it with anything else.
And voila! Much more better! I think all I did was add the green here and there. Now to hang it somewhere. My guest bathroom is a violent shade of green, in fact it almost matches the green on this painting. There is also a watermelon pink shade on one wall of this bathroom. I will not show you pictures of said color combination, haha. My husband has a two year rule on painting, therefore the colors remain, besides, those colors will make for a fantastic kiddie bathroom one day, so I may just leave it as is. (It was supposed to be a charming beach theme.) Once in the bathroom, I turned it on it's side, and liked it even better!
What is that great fish sitting on top of, you may ask? Why the toilet of course, which no-one needs to see. I think it looks rather nice!
Here is a closeup.
That was my little adventure in paint. I rather enjoyed it, and I think I'll start painting more often. I still have that vision of a gorgeous peacock floating in my head, and it must out!
Love, peace, and blessings!
Thursday, December 19, 2013
Go Home Pinterest, you're drunk!
My last minute 'Oh yeah, I bought that a month ago to do for a Christmas craft project!' ornament. I highly recommend using a plastic Christmas ball, there's no way a glass one would have worked for this one.
Take off the top.
Choose your color(s).
And begin!
Put the top back on, (very carefully), and shake. Shake it high, shake it low, shake it up, shake it down, then groan when it doesn't turn out exactly the way you wanted, haha.
Still, not bad, and I enjoyed it as a project! I'm definitely going to do more of these, with visions of glitter and hot pink colors dancing through my head!
Merry Christmas!
Thursday, December 5, 2013
Coral Refashion. Can't Wait For Spring!
Hello again! Today I'm showing a new favorite refashion. This coral two piece, way too big dress probably was the hot thing for office or church wear in it's day, but I'm going to give it a new spin!
As you can see, it needed a bit of lovin.
Unfortunately, I lost my pictures of the refashion process when I ordered a new phone, my old one decided to stop working when I tried to transfer info to the computer. Bum. You'll just have to use your imagination.
I toyed with multiple ideas but finally decided to chop the top sleeves off and go for a mid length maxi. I had been so happy about the fact that this dress had a zipper, then realized with chopping off, that it would need a new zip. I rummaged around my notions, and found a white zipper. It's not the invisible kind, but I liked the contrast. So I put on my brave face and attempted my first ever zip. (After I watched a few tutorials, haha). It was a 'zip-cess'! (Say Cheeeeeeeese!)
I had to take it in around the bust for a more fitted look, (and so it would actually stay on), and it actually took me two tries to take it in, gah! Even then I still had to take it in around the bust (there's an actual name for that, that I'm sure I'll remember once I hit the 'publish' button.). So now my pretty dress wouldn't fall off of me when I walked. I'd given myself plenty of room up top for modesty purposes, but was still worried about the dress just not staying put. So I thought about getting some white ribbon for straps, to match the white zip in the back.
Then I realized the detail on the jacket (where it buttons up) was rather pretty, and wouldn't be so tacky if it was turned into halter straps. So halter straps I made. Sewed up the slit in the back just a bit, and my new comfy dress was ready Freddie!
I really like it, and it's got that comfy, southern, summer feel, so even though it's December, (78 degrees outside, I'm in The South ya'll), I may wear it whenever I choose anyway, and not wait til spring. Maybe I'll set a new trend, haha..
I think I will eventually raise that hem a couple of inches, but I'll do that later.
Much love!
Thursday, November 21, 2013
Lots and lots of yarn
A few months ago I finally learned how to crochet a granny square, yay youtube tutorials! Oh the joy, now I can make those amazing blankets I keep seeing on Pinterest! I grabbed a gorgeous dark aqua green color and made a whole bunch of squares! I started laying them out on the floor after I'd made about a dozen or so, I wanted to make a blanket big enough to cover my king size bed. After about twenty squares, I laughed and said, 'ok, smaller blanket it is!' I did the math on how many squares I'd have to do for a throw sized blankie, and wished I'd been a lot more smart, and a little less enthusiastic. 130 granny squares later, in several alternating colors, and I was done! This took a couple of weeks. Then I had the pleasure of realizing that my simple plan of sew/crocheting them together with some awesome black yarn to offset the colors, couldn't be done the way I wanted, and I had to individually crochet a black edge and then attach them together. I don't know what it is about me and doing things the hard way.. Here are the colors I chose.
What did they combine into?
Ta da!! The first blanket I've ever completed! (If you don't count small, basic baby blankets.) I actually made more than 130 squares, but I somehow missed that I had two more light green squares to attach in the middle, and went ahead with red, purple, and such.. Didn't discover my mistake til it was too late, at which point I just laughed and carried on anyway. This project was fun to do while watching movies and riding in the car.
Just finished another fun refashion, hope to have pictures and blog post up soon!
Sunday, November 10, 2013
From dated elegance to modern elegance!
Hello my friends! I've been such a slacker lately, my last refashion was almost a month ago.. yikes! I've been very busy lately, in a very good way! More on that later though, let's get to the refashion!
I found this pretty little thing at a thrift store for $5.
I think it's rather elegant as is, but as I am about 15 years too young for this particular look, a little altering was required. The shoulder pads were the first to go, of course. Simple enough, now for the length. My original thought was to cut it off just under the sleeves, and turn the skirt into a maxi dress/skirt. I thought it would make an elegant skirt, but was uneasy about it so I asked a couple of my girls what they thought, and none of them thought it was a good idea to do something that drastic for this piece. (It's a Jessica Howard, probably between $70-$100 originally.) So I chopped to make it above the knee instead.
I thought it was quite convenient that the design of the dress was pretty much right where I needed it for choppage, and choppage commenced. Only for me to discover that I had committed my customary mistake of cutting too short. I suppose I'll learn one of these days. But then, you learn cool things from your mistakes eh? Looking for a silver lining here. I went on to the sleeves and decided to worry about the length later. Those were pretty easy, remove and hem. (I should have given myself a leetle extra room on the outside layer of fabric for hemming the sleeves, but no harm was done, I managed fine.) Now about that length.
I looked at my remaining scrap, which I had thought about possibly turning into a lovely pencil skirt (there was actually enough fabric for that), but then realized I'd need part of it to lengthen my dress. I thought about using the natural hem, and spare myself some stitching, but upon further inspection, found out why the previous owner had disposed of the dress in the first place. Some yukky looking stains.
I don't know if it's very clear from this pic, but those are definitely some kind of yellowish stains, I dare not try to find out what. Well never mind then! I went to the top of the scrap piece and realized I could chop down to the next straight bar of the design, and attach that to the bottom of the skirt. You can see from the design that I couldn't just use any part of the skirt, it had to flow and match somehow. Chop again, very very carefully. I pinned my 3 inch section of newly chopped fabric to the bottom of my dress, and discovered it would be perfect! Sewing commenced! Stitch stitch whiiirrrrr... Happily I go til the last six inches, whereupon I realized I would be just over half an inch short. I really don't know how that happened. Groan!!!! After having a teensy tiny little meltdown, I decided to see if this particular knit/metallic/something else fabric had any reasonable stretch to it, and thanks be, it did! I stretched the fabric to make it fit, which it just barely did (and btw, that is totally cheating, but who cares?) And the dress was finished! I took a good look at it and realized I would not have to hem it at all, so that worry was removed. Now I just had to match jewelry and I'd be good to go! I have to add here that I considered dying it originally, maybe a lovely light blue? But took a look at the different fabric combo and looked up everything I could about dye, and decided it wasn't worth the risk on something this pretty.
I discovered that much to my dismay, gold was really the only thing that would go with it, and I am NOT a gold fan. I have exactly two pieces of gold jewelry, and both pieces are more costume jewelry than fine, but that actually ended up working just fine.
So, on with the gold jewelry and pink shoes! (That combo actually did go together quite well, but I forgot about those shoes for the pic.. oops!)
Voila!
You see? Not so bad after all I think! It's virgin outing was to a wedding. A wedding to which I was greatly overdressed, but I styled and profiled anyway! I love the way the bottom strip looks like it ruffles in the breeze. (It totally does), and I think it looks like it was made that way. :)
Before and After
I think this one is my favorite refashion yet! Much love! I've purchased about four other new refash's, hopefully it won't take me a month to complete and post this time, but it's holiday season, I've got a Christmas play and alot of other things, so promise you won't be too disappointed if I don't get to it!! Much love!
Subscribe to:
Posts (Atom)