Thursday, August 17, 2017

All Things Austen

Hello my beauties! It's been ages since I've done anything in the refashion/craft world, I've been through several relocations, and am currently in a small apartment that makes crafting a little difficult (not complaining AT all, that's just where I am in life right now.) But I've started doing a few things again, so we'll start off with this one. 

I'm in LOVE with the idea of this craft. It is a refashion, of sorts. Here's the original. An ordinary, small journal that someone gave me at a Bible study years ago. I wrote in about 8 pages of it, which I ended up taking out for this project.


I bought some lovely paper from Hobby Lobby, and mod podged it onto the diary. It was a pattern, so I wanted to make sure it was centered. Not pictured, I laid a book on top of the diary as the glue was drying, not entirely sure it was necessary, but it didn't do any harm.


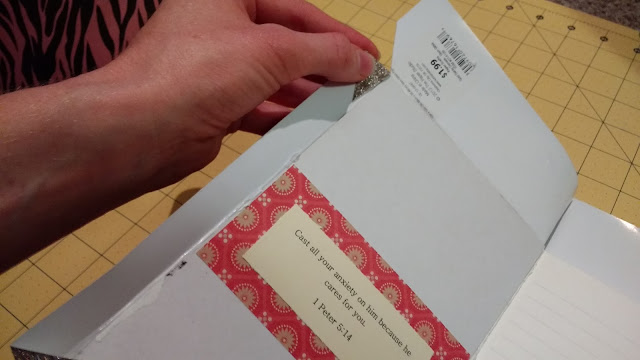
Above is the whole page now glued to the book. Mod podge dries pretty fast, I was glad I didn't have to wait hours to do this project. Look at the cuts I was making below. I knew I wanted to fold the papers over and glue them to the inside of the book, to prevent the wear and tear from separating the page from the book, (ya know, like they do on real books, haha)

Cutting and folding, folding and gluing, it's all going very well, better than I thought.


You'll notice that I had to cut a little more off from the sides of the spine in order to fold it down properly over the edge of the book. (I really hope that makes sense.) In the second picture, those lovely ladies, which were the main part of the whole 'Inspired by Jane Austen' thing, were originally going to decorate the front and back of the book, but they just didn't go with the pretty cover paper, they ended up clashing. It looked decent in a picture, but not in person, and I wasn't having that.


 I tried several different types of decor, none really seemed to work, and really, this cover paper is pretty all by itself.


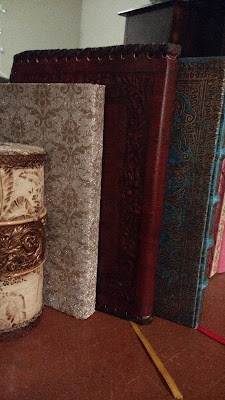
Look at the sparkle, look at the shine! It makes a lovely addition to my classically inspired diaries! (Although I'm still not finished with the brown one, just wanted to show the collection. The sparkly one is next. :)


 I thought about adding ribbon around the edges of the diary, but I think this paper was meant to stand on it's own, with no extra frills needed. I took that oversized ribbon that's been in my collection for EONS (it might actually be older than me!) and trimmed off both sides of that gold mesh, leaving the skinnier ribbon pictured below, and voila! A bookmark! NOW it is complete. (I think.) Pictures do not quite do it justice, it is just beautiful in person. My husband was rather impressed with the making of it, even he thinks it looks very nice!


Rehash, the before and after. Love!!


Friday, April 1, 2016

Dressy, Tunic-y Pale Pink Things.

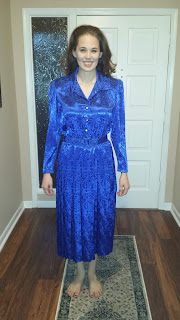
Hello again! Today's refashion is a dress that is almost identical to the dress I used to make that deep blue cape out of, but with a different print, and I was SO tempted to make a cape out of this one too, the fabric was JUST gorgeous! But I took a look at the design, which was slightly different in one spot of the dress, and had a different idea. I loved the bottom part of the skirt the best, and wanted to showcase that as much as possible, which would probably involve me ironing out those pleats eventually.. But let's hop to it shall we? (This one cost seven and a half dollars, which is a little steep for thrifted garments for me, but every now and then it's worth it eh?)


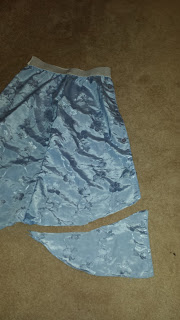
I ironed out the pleats and then carefully turned the gown on it's side like so, pinned the sides together so I would cut everything evenly, and started to cut. I'm not sure that makes sense, I hope you can see from the picture what I did. The long, skinny stretch of fabric was originally the buttons and corresponding button holes. The top wider part is the intact collar.


This is what was left of the top once I had cut out what I wanted? Am I going to throw it away? Absolutely not! This is pure gold! I see an Austen inspired Spencer in it's future!


I measured from the back how much I needed to take in the elastic, it was too big for me at this point. I took it in about four or five inches and sewed that up, later removing it once I was certain I wouldn't need to take it out. 


I sewed a hem down on my new straps, sewed those down in their proper place on the back of the garment, and hemmed up around the elastic. I later had to take fray glue to the edge of that hem around the elastic, seemed to solve the problem pretty well. Just look at this adorable feature on the back! I left the button and simply buttoned it up before I sewed the straps in place. 


So here it is, in all it's imperfect glory! And without the belt, it will double gloriously as a maternity top one day. I love how comfortable it is, and I get to showcase the bottom half of that skirt that I like so much!


I feel like there's so much scope for the imagination with these types of dresses.. Keep em coming!


Thursday, March 31, 2016

A Little Riding Hood

Today's refashion was really fun! I found this gorgeous blue number at a thrift store, some small stain on it that looked like ink maybe? But not a serious issue considering I know where the stain is and it still takes me a bit to find it. :D

Look at the color!


This is very me. I heart blue alot. But what to do with it? I thought about making it a peplum, remove the sleeves and play with the neckline a bit, pair a contrasting belt.. (it actually came with a matching belt that really looks nice. I will be pairing that belt with other contrasting tops and dresses in the future.. yay versatility!) 
That probably would have looked great, but that didn't seem to be quite right. Then, inspiration struck! I played with it alot of different ways before I did any cutting because I was fairly certain I would not be able to recover from a wrong cut and still accomplish the desired look.


I cut off the sleeves, leaving several inches of material.


Buttons begone! I could have reused one button for this piece, but it didn't look quite right. I confess I don't save buttons, which is probably a bad idea, but I currently have no use for them, and button inspired jewelry doesn't ring my bell at all.


I put the skirt over the dressform and let it hang just so, then marked with pins where I wanted to cut it, then cut it I did. A straight a line as I could manage from bottom to top, stopping just short of cutting the elastic that was around the waist. Can you see where I'm going with this?


I glued up the edges so they wouldn't fray, I played and played with that hood to make it just right, I turned the collar out and sewed it down to the fabric on the side to create a more hood like shape. It doesn't look perfect from the side because I didn't sew the armholes up, it didn't look right. I sewed up the edges of what I'd left on the sleeves, and then sewed the ends of the sleeves to each other from inside the hood, which helped it stay on better somehow. It was quite an experiment! I may someday attempt to use what's left of the sleeves, and add fabric to the hood to make it more hood like, but I'm too skeered to right now. But I really like it! (May attempt this again with a similar dress that I don't care if I ruin, just to see if the sleeve thing works, and how to do it. If I make something like this again, I intend to do it with a dress that is at least a large, if not larger. There will be loads more material to work with in such as case, and it would probably look a little more realistic.) But I am very happy with it nonetheless. Now I just need to figure out where I can wear this outside of costume parties and movie sets!


Tuesday, March 29, 2016

A Delicate Shade of Blue

Today's refashion was very much an experiment. I found this at a 'by the pound' thrift store (LOVE those), and bought it along with about 8 other things for about $3.50. That was actually my Valentine's Day prezzie, spending the morning with my beautiful hubs and walking out with an armful of old, ugly clothes... it's the life!


Look at all those delightful goodies!

That pale blue thing in the middle is what I'm going to post today. It was a nightgown, several sizes too big.


Yi yi yi.. But it's a nightgown, so is it really that bad? Anyhoo, I browsed Pinterest for longer than I care to admit, looking for a little inspiration. I already knew I wanted a hi-low skirt, but wanted to do something I haven't done yet. And that's exactly what I ended up doing. Check it out.


I deliberated at some point simply taking it all in and leaving the sleeves large and flowing like a kimono, it really did look lovely that way (in imagination land at least), but thought I definitely wanted to try the idea I found on Pinterest. So I tried it on and found the approximate place for cutting it which would leave me with both plenty of room for the skirt, and enough room for the top I had in mind. (I think I barely managed.)


With said top part, I sewed up a hem on the bottom of the shirt with enough room for the elastic to fit, and left room for said elastic to be threaded through. I used the safety pin to guide it. It fit very nicely around my rib cage.


I sewed up the button up part as I would not need the buttons to get this top on and off. I wanted to cut the top in a large scoop neck that would allow for more elastic in that peasant top look, (see where I'm going with this senoritas?) I ended up doing this:


Isn't it amazing how chopping can be simultaneously terrifying and satisfying?

After I sewed that up and threaded elastic through it, I decided to play with the skirt for a change of pace.


 I found some pretty silver elastic for the belt part of the skirt, I wanted it attached, would save me the trouble of fitting said skirt, or adding a zip. Sewing all of that one was an interesting challenge, I'd never done it before, but it ended up looking pretty good.


Then the funner part came, of chopping the hi-low. I chopped it alot longer than I thought I wanted it, and only took off an extra inch and a half in the tweaking of it. I did not bother to give it a hem, the fabric is a bit fraying, but I'm not really bothered by that for this outfit.


The sleeves were the last thing to do, and for some reason they were the trickiest of all. Note to self: if I do this type of sleeve again, give myself plenty of extra fabric for a hem. My future self thanks me. You're welcome self.
I gave them the same elastic treatment as the rest of the top. Doesn't it look like a cute bonnet from this angle? Moving on...


I finally tried it on with great fear and trepidation, how would it look? 

I wasn't initially satisfied with the look, I didn't want my midriff to show, and none of my tank tops were a good color to match with this blue. (Pale yellow might work, but do I look like a yellow loving person to you? Yellow is NOT my color in any shade.)
So I played. And played, then struck inspiration with a large purple belt I found for maybe three dollars at Goodwill. You wouldn't think pale blue and dark purple would go together, but oddly enough, it worked. Check it out!


Allow me to assure you this actually looks cuter in person, sometimes the picture doesn't do it justice. I wore this to a birthday party, and one person commented on it, was very surprised that it had originally been a nightgown, so I'll call it a success!


Sunday, March 27, 2016

Happy Easter!

Happy Easter, He is Risen, He is risen indeed!

Today's refashion is not as drastic as some of my other ones, but it is delightful, if I may say so. :)

It's pink! Not too bright, not too pale, I love it!


See, it really does have loads of potential! It's not too terribly hideous, but has plenty of room to work with it. I know I didn't pay more than $5 for this, so to end up using it as my Easter dress, really is not shabby at all, and works beautifully with my passion for economy.


Chop the top from the skirt. You can see the skirt part is elastic, which makes my job alot easier.


The now free skirt is several sizes too big, so I cut open a slit on the inside of the skirt, pull out the length of elastic I needed to shorten, and sewed it up. I decided not to cut the elastic, but rather sew it all up, in case I need to let it out again someday, it'll be much easier to let out existing elastic rather than replace the entire amount.


Of course I have to chop the sleeves, and hem accordingly. I didn't take the top in at all, it works as a loose fitting top, and also for what I had in mind for this particular outfit.

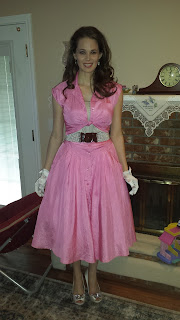
It was cold when I found and created this ensemble, and I wanted to wait til Spring to wear it. I also didn't have a right sized crinoline to make the skirt poofy until the week before Easter. I found a voluminous handkerchief style white skirt that JUST fits, and creates a nice poof. I added my black crinoline that I wore under my Christmas dress for a little extra poof, and was very pleased with the results! (And realized after I took the pic there was a water spot on the skirt, which was probably dry 5 minutes later, haha)


And there it is! Kid gloves and white heels, pearl earrings! Paired the skirt with my white seed pearl belt... I love how it fits! The picture does not do it justice!